Category Archives: How I took that shot

How I Took That Shot – Noelle Lowney

Noelle Lowney took first place in Grade B in our recent ‘Selfie’ competition with the shot above. This is how she made it:

The image was taken in the grounds of Curragh chase Forest Park, Co. Limerick.

This competition topic, Selfie, was challenging on its own not to mind being too shy to face the camera.

I took a few test shots first to see how the camera settings worked out. Once happy with the exposure, I placed the camera on a tripod and set the self timer to fire after 10 seconds and take the shot whilst I stood on the bridge.

The shot was taken on a Canon EOS 7D Mark II – Camera settings AV (Aperture Priority), F/6.3, ISO100 and Shutter Speed 1/200. 

Well done Noelle.

Click here to see a gallery of images from the competition.

See also:
How I took that Shot – Finbarr O’Shea
How I took that Shot – Jim Curtin
Winners Presentation Photos
Competition Results and 2017 League Table


How I Took That Shot – Jim Curtin

Jim Curtin took first place in Grade C in our recent ‘Selfie’ competition with the image above. This is how he made the shot:

Selfies – what are they?. There were 14 opinions entered in this competition. My one started with a U-Tube show on another competition night when prompted  to do a lookalike of Robert Osborne fine art Photographer. So I grew the beard, got the shirt, had the cap and added the pipe. I set up the corner in the bedroom with a black backdrop and my camera on a tripod.  After an amount of trial and error I had several shots that were workable. The lighting was a side view of natural light with the blind pulled down to kill the light a bit. The use of Lightroom was vital to use the Dark and Shadow sliders.

Camera settings:  Canon 100D with kit lens (18-55) ,1/6 sec., f4.0, ISO 100. I worked the camera remotely with the switch in my hand. No flash used.

Well done Jim.

Click here to see a gallery of images from the competition.

See also:
How I took that Shot – Finbarr O’Shea
How I took that Shot – Noelle Lowney
Winners Presentation Photos
Competition Results and 2017 League Table


How I Took That Shot – Paul Stack

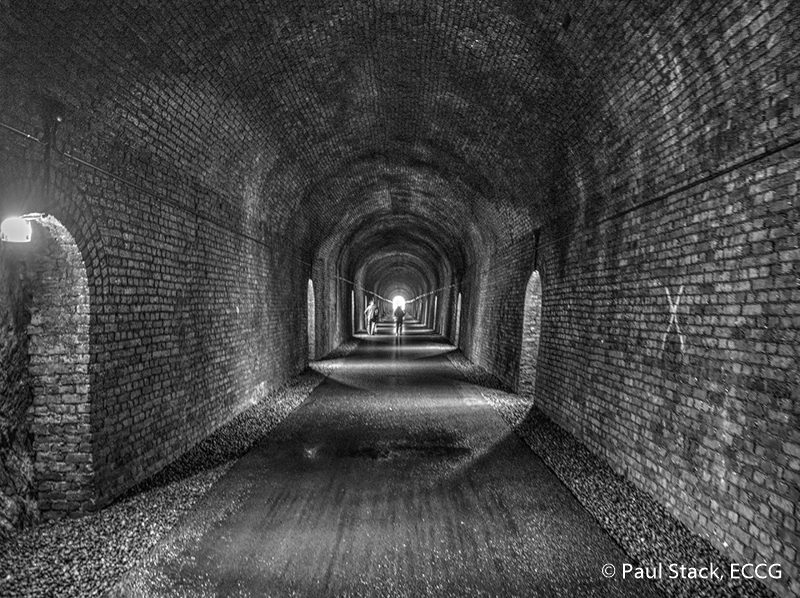
In our recent ECCG ‘Shoots’ Competition, entered images had to have been taken during one of our scheduled shoots held during 2017. Paul Stack took first place in Grade C with just seven points to spare. This is how he made the image:

Thanks to Finbarr for the Copper Coast plan and Michael for knowledgeable driving on route to the Copper Coast in Waterford on a nice day in April 2017. Normally my excursions to Waterford would involve the Comeraghs to get out and enjoy the views with my camera.

The Greenway was the first stop on the Copper Coast Photoshoot excursion, and although the initial plan was to capture one of the viaducts, we strolled down to the Ballyvoyle Tunnel near Shanacool parking area. A very interesting feat of engineering. From deisegreenway.com, “The Railway Line from Dungarvan to Waterford was constructed during the 1870’s and was officially opened on the 12th August 1878”. It has been reopened in recent years providing a long route between Dungarvan and Waterford city for pedestrians and cyclists, and prams 🙂

On entering and leaving Ballyvoyle tunnel I caught a few nice views. I quite enjoy the challenge of capturing images in dark light or night time and the tunnel was a good test of camera skills. Also appeared like some longer tunnel photos looked really good on my camera screen. But I had a feeling when I look at the images from the tunnel at home that they would be blurry, and they were…

So this is where HDR, High Dynamic Range, Photography comes in. In the weeks leading up to the photoshoot I had come across some HDR tutorials and reviews and enabled the saving of RAW format images on my camera as they contain more image information that can be found on a normal JPG image file. 

Anthony gave a tutorial in a ECCG meeting around the same week. As a result I downloaded the free version of Photomatix software and did some experiments at home but found a terrible watermarks in the saved images, despite all the time spent in styling.

In purchasing recent cameras i’ve been lucky with increased stabilization with less chance of blurring an image. The camera was Olympus OM-D E-M5 with a standard lens of M.Zuiko 12-50mm ƒ/3.5-6.3. 

The image was about a 2 second exposure, and for me taking multiple attempts should normally achieve a non-blurry image.

It should also be mentioned that we had much less traffic inside the tunnel to allow for much better opportunities and less crowded to capture the surroundings.

Before shot at about 25% of the JPG file: (Image: P4090090_small) 

Using the RAW file I did some trials with different settings, but had to restart a number of times due to losing the image quality. Sometimes the generated final image with Photomatix just got distorted. The image displayed in Photomatix is a more recent darker attempt, but the figure in the light at the end of the tunnel loses their head. This version is closely related the the Monochrome 2 preset in Photomatix, whereas the competition image is closer related to Monochrome 3 with a lot of tweaks and adjustment to the settings displayed on the right side of Photomatix.

I was aiming to make the image as smooth as I could see it, with keeping an eye mostly on the shadows across the path and trying to emphasize those, while also keeping an eye of the figure in the light at the end of the tunnel. But in applying the HDR process to non-blurry images it didn’t have the same emphasis as the lighting was from the other side of the tunnel. So the light at the end of the tunnel was behind me in this case.

 – Paul Stack

Well done Paul.

Click here to see a gallery of images from the competition.

See also:
How I took that Shot – Michael Hickey
How I took that Shot – Noelle Lowney
Competition Gallery
Winners Presentation Photos
Competition Results and 2017 League Table


How I Took that Shot – Zane Llewellyn

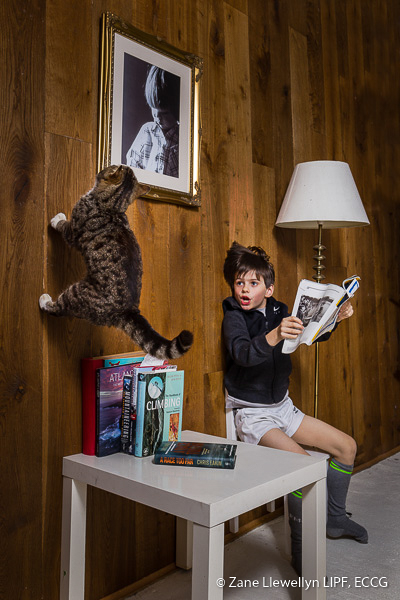
In our recent ‘Perspective’ competition, Zane Llewellyn took first place in Grade A, for the third time in a row this year, with the clever image (left).

This is how he made the image:

When I think of perspective, I immediately think of the “Small, Far Away” scene in Fr. Ted.
I really wanted to use this as my inspiration, but unfortunately there weren’t any cows out in March and I was also missing a priest costume.
Plan B…
The first step in taking this photo was to move all the furniture out of the way, as this was the only floor that would look like a wall.
I took the photo in landscape so it would be in portrait when rotated which would help to emphasise the vertical lines and make it more believable. I positioned the table and chair while checking the framing, once I was happy with the basic composition I set up the books, picture and lamp. I only thought afterwards that I should have tried turning the lamp on!
I had to handhold the camera as I was backed up into the corner to try and get everything into frame, I tried the flash directly and bouncing it off the ceiling but the dark floor was proving difficult. So, I ended up using a white umbrella just out of shot.
I tried to coax my dog into the photo, but she didn’t want anything to do with it, so I grabbed the neighbours cat!
Then the fun began, the cat was walking around wondering what was going on, while I shot a handful of photos. My model son?, my son the model played a blinder and he really made the shot. So a big thanks & some biscuits to him for that 🙂
I used the following settings for the final shot,
24mm 1/180s @ f/8 ISO100
Flash – ETTL mode shooting through a white umbrella.
Fantastic shot Zane. Well done!

How I Took that Shot – Eileen Upton

In our recent ‘Perspective’ competition, Eileen Upton took first place in Grade B with the image above. This is how she made the image:

When the theme of “Perspective” was announced I immediately thought of my friend, Elizabeth Mansfield , an Artist, whom I photographed last year in Ballycotton when she was starting a painting. Elizabeth is a member of “en Plein Éire” and works in both oil and watercolour mediums. I told her of my idea for a photograph and asked if she would recreate the scene for me but this time with the finished painting. We met up at the original vantage point and with paint brush in hand she posed for me. In my photograph I tried to portray my perspective of the Painter’s perspective of the Island of Ballycotton.

Taken with Canon EOS 80D

Settings used :-
Manual Mode.
Lens : 17 – 55 mm
Aperture: F 9
Shutter speed: 1/250.
ISO: 400.

Well done Eileen!

Click here to see a gallery of images from the competition. Enjoy!

See also:
How I took that Shot – Zane Llewellyn
How I took that Shot – Sonja Eisenberg
Competition Gallery
Winners Presentation Photos
Competition Results and 2016 League Table

If you are interested in photography and would like to know more about East Cork Camera Group, click the ‘Contact Us’ link above.